
TIP
- Macbook AirのM1チップGPUを使ってニューラルネットワーク画像分類を実行し、速度と精度を確認しました。
- 使用したデータセットはCIFAR-10
- 画像分類タスクにはResNetを使用しました。
- 解説を踏まえて実験結果を記載していきます。
ResNetについて
まず、データセットCIFAR-10の画像分類タスクについては解説を省略します。これについては前回の記事で触れています。 ResNetは2015年に発表された畳み込みニューラルネットワークの一種で、その大きな特徴して、残差ブロックがあります。残差ブロックというのは、畳み込み層にショートカットコネクションという迂回ルートを用意することで不要な畳み込み層の学習を回避し、これまでより深い層構造のニューラルネットワークを可能にしている構造のことです。
原論文については、arxivから当たることができます。https://arxiv.org/abs/1512.03385 より深い層構造、ということは計算量も多くなりそうなので、M1チップじゃ心もとない、というところなのですが、学習にかかる時間と精度に関して、同じタスクを行った前回の記事の結果と比較していきます。
ちなみに、予め言っておくと、前回の結果は以下の通りでした。
- バッチサイズ128・エポック数20程度の学習終了までにかかった時間は238秒(4分)程度。
- 1枚の推論にかかる時間は 0.008秒程度。
- テストデータでの正解率は78%程度。
さて、それでは早速実行していきましょう。
パッケージのインポート
使用するのは主にtensorflow(機械学習),numpy(行列計算),matplotlib(グラフ等のプロット)です。
# パッケージのインポートfrom tensorflow.keras.datasets import cifar10from tensorflow.keras.callbacks import LearningRateSchedulerfrom tensorflow.keras.layers import Activation, Add, BatchNormalization, Conv2D, Dense, GlobalAveragePooling2D, Inputfrom tensorflow.keras.models import Modelfrom tensorflow.keras.optimizers import SGDfrom tensorflow.keras.preprocessing.image import ImageDataGeneratorfrom tensorflow.keras.regularizers import l2from tensorflow.keras.utils import to_categoricalimport numpy as npimport matplotlib.pyplot as plt%matplotlib inlineデータの確認
まず、CIFAR-10データセットをtensorflow.keras.datasetsから読み込み、中身を確認していきます。
# データセットの準備(train_images, train_labels), (test_images, test_labels) = cifar10.load_data()# データの形状確認print(f"train_images.shape:{train_images.shape}")print(f"train_labels.shape:{train_labels.shape}")print(f"test_images.shape:{test_images.shape}")print(f"test_labels.shape:{test_labels.shape}")train_images.shape:(50000, 32, 32, 3)train_labels.shape:(50000, 1)test_images.shape:(10000, 32, 32, 3)test_labels.shape:(10000, 1)# データセット画像表示plt.figure(figsize=(10,4))plt.subplots_adjust(wspace=0.3, hspace=0)for i in range(10): plt.subplot(2, 5, i+1) plt.imshow(train_images[i])plt.show()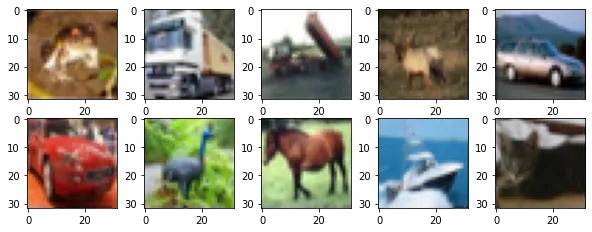
# データセットのラベルの確認print(train_labels[0:10])[[6] [9] [9] [4] [1] [1] [2] [7] [8] [3]]データの前処理
正解ラベルの数字をone hot表現のカテゴリカルデータに変更し、変更できているかデータの形を確認します。
# データセットの前処理train_images = train_imagestrain_labels = to_categorical(train_labels)test_images = test_imagestest_labels = to_categorical(test_labels)# データセットの前処理後のシェイプの確認print(train_images.shape)print(train_labels.shape)print(test_images.shape)print(test_labels.shape)(50000, 32, 32, 3)(50000, 10)(10000, 32, 32, 3)(10000, 10)ちゃんとラベルデータが数字表示からone hot表現の10種類に変わっています。
ネットワークの生成
今回はニューラルネットワークの生成にtensorflowのFanctional APIを使用します。 functional APIは,複数の出力があるモデルや有向非巡回グラフ,共有レイヤーを持ったモデルなどの複雑なモデルを定義するためのインターフェースです。 詳しい説明は公式解説サイトにありますので参照ください。 https://keras.io/ja/getting-started/functional-api-guide/
畳み込み層の正規化にはL2ノルムを用いています。これは、極端な重みを0に近づける効果があります。
# 畳み込み層の生成def conv(filters, kernel_size, strides=1): return Conv2D(filters, kernel_size, strides=strides, padding='same', use_bias=False, kernel_initializer='he_normal', kernel_regularizer=l2(0.0001))# 残差ブロックAの生成def first_residual_unit(filters, strides): def f(x): # →BN→ReLU x = BatchNormalization()(x) b = Activation('relu')(x)
# 畳み込み層→BN→ReLU x = conv(filters // 4, 1, strides)(b) x = BatchNormalization()(x) x = Activation('relu')(x)
# 畳み込み層→BN→ReLU x = conv(filters // 4, 3)(x) x = BatchNormalization()(x) x = Activation('relu')(x)
# 畳み込み層→ x = conv(filters, 1)(x)
# ショートカットのシェイプサイズを調整 sc = conv(filters, 1, strides)(b)
# Add return Add()([x, sc]) return f# 残差ブロックBの生成def residual_unit(filters): def f(x): sc = x
# →BN→ReLU x = BatchNormalization()(x) x = Activation('relu')(x)
# 畳み込み層→BN→ReLU x = conv(filters // 4, 1)(x) x = BatchNormalization()(x) x = Activation('relu')(x)
# 畳み込み層→BN→ReLU x = conv(filters // 4, 3)(x) x = BatchNormalization()(x) x = Activation('relu')(x)
# 畳み込み層→ x = conv(filters, 1)(x)
# Add return Add()([x, sc]) return f# 残差ブロックAと残差ブロックB の生成def residual_block(filters, strides, unit_size): def f(x): x = first_residual_unit(filters, strides)(x) for i in range(unit_size-1): x = residual_unit(filters)(x) return x return f# 入力データのシェイプinput = Input(shape=(32,32, 3))
# 畳み込み層x = conv(16, 3)(input)
# 残差ブロック x 9x = residual_block(64, 1, 3)(x)x = residual_block(128, 2, 3)(x)x = residual_block(256, 2, 3)(x)
# →BN→ReLUx = BatchNormalization()(x)x = Activation('relu')(x)
# プーリング層x = GlobalAveragePooling2D()(x)
# 全結合層output = Dense(10, activation='softmax', kernel_regularizer=l2(0.0001))(x)
# モデルの作成model = Model(inputs=input, outputs=output)Metal device set to: Apple M1
2022-07-03 10:56:53.472601: I tensorflow/core/common_runtime/pluggable_device/pluggable_device_factory.cc:305] Could not identify NUMA node of platform GPU ID 0, defaulting to 0. Your kernel may not have been built with NUMA support.2022-07-03 10:56:53.472714: I tensorflow/core/common_runtime/pluggable_device/pluggable_device_factory.cc:271] Created TensorFlow device (/job:localhost/replica:0/task:0/device:GPU:0 with 0 MB memory) -> physical PluggableDevice (device: 0, name: METAL, pci bus id: <undefined>)from tensorflow.keras.utils import plot_model# モデル構成をプロットplot_model(model, show_shapes=True, expand_nested=True)
しっかりと迂回ルートが構成されていることが見てわかりますね。
モデルのコンパイル
モデルを構成したら、コンパイルします。
最適化関数にはSGD(確率的勾配降下法)を使っています。
※SGDは最急降下法に似た最適化関数で、最急降下法がパラメータ一回の更新に全データを使うのに対し、SGDではランダムにピックアップした1つのデータを使います。
# コンパイルmodel.compile(loss='categorical_crossentropy', optimizer=SGD(momentum=0.9), metrics=['acc'])データセットの水増しと正規化
続いて、ImageDataGeneratorを使ってCIFAR-10データセットの画像の水増しと正規化を行うことで、データ量の確保と計算量の節約をします。 公式のライブラリ解説はこちらにあります。 https://keras.io/ja/preprocessing/image/
# ImageDataGeneratorの準備train_gen = ImageDataGenerator( featurewise_center=True, # 入力平均0 featurewise_std_normalization=True, # 標準偏差で正規化 width_shift_range=0.125, # ランダムに水平シフトする割合 height_shift_range=0.125, # ランダムに垂直シフトする割合 horizontal_flip=True) # 水平方向にランダム反転test_gen = ImageDataGenerator( featurewise_center=True, featurewise_std_normalization=True)
# データセット全体の統計量を予め計算for data in (train_gen, test_gen): data.fit(train_images)LearningRateSchedulerの設定
学習中に適度に学習率を変化させるLearningRateSchedulerというコールバック関数を定義します。 エポック数によって学習率を変化させる設定をします。
公式解説 https://keras.io/api/callbacks/learning_rate_scheduler/
# LearningRateSchedulerの準備def step_decay(epoch): x = 0.1 if epoch >= 80: x = 0.01 if epoch >= 120: x = 0.001 return xlr_decay = LearningRateScheduler(step_decay)学習
いよいよお待ち兼ねの学習です。 バッチサイズは前回同様128で、エポック数は一応前回と同じ20にしておきましたが、 テスト結果が芳しくなかったため、200エポックの学習を載せています。
M1チップGPUでの学習速度の検証も兼ねているので、前回同様処理時間の表示を仕込んでおきます。
# 学習import timenow = time.time()batch_size = 128history = model.fit_generator( train_gen.flow(train_images, train_labels, batch_size=batch_size), epochs=200, steps_per_epoch=train_images.shape[0] // batch_size, validation_data=test_gen.flow(test_images, test_labels, batch_size=batch_size), validation_steps=test_images.shape[0] // batch_size, callbacks=[lr_decay])print(f"学習にかかった時間:{time.time()-now}[s]")Epoch 1/200
/var/folders/nd/0z0s7wlj02n0lbwyl29p75mm0000gn/T/ipykernel_25473/866681920.py:5: UserWarning: `Model.fit_generator` is deprecated and will be removed in a future version. Please use `Model.fit`, which supports generators. history = model.fit_generator(2022-07-03 10:56:56.196695: W tensorflow/core/platform/profile_utils/cpu_utils.cc:128] Failed to get CPU frequency: 0 Hz2022-07-03 10:56:56.957979: I tensorflow/core/grappler/optimizers/custom_graph_optimizer_registry.cc:113] Plugin optimizer for device_type GPU is enabled.
390/390 [==============================] - ETA: 0s - loss: 2.0552 - acc: 0.4150
2022-07-03 10:57:54.815061: I tensorflow/core/grappler/optimizers/custom_graph_optimizer_registry.cc:113] Plugin optimizer for device_type GPU is enabled.
390/390 [==============================] - 62s 156ms/step - loss: 2.0552 - acc: 0.4150 - val_loss: 2.9175 - val_acc: 0.3519 - lr: 0.1000Epoch 2/200390/390 [==============================] - 60s 155ms/step - loss: 1.5641 - acc: 0.5932 - val_loss: 1.9878 - val_acc: 0.5172 - lr: 0.1000Epoch 3/200390/390 [==============================] - 60s 155ms/step - loss: 1.3351 - acc: 0.6664 - val_loss: 1.6114 - val_acc: 0.6044 - lr: 0.1000Epoch 4/200390/390 [==============================] - 62s 160ms/step - loss: 1.1736 - acc: 0.7169 - val_loss: 1.4399 - val_acc: 0.6398 - lr: 0.1000...Epoch 195/200390/390 [==============================] - 65s 167ms/step - loss: 0.1687 - acc: 0.9920 - val_loss: 0.4658 - val_acc: 0.9184 - lr: 0.0010Epoch 196/200390/390 [==============================] - 65s 167ms/step - loss: 0.1657 - acc: 0.9929 - val_loss: 0.4606 - val_acc: 0.9193 - lr: 0.0010Epoch 197/200390/390 [==============================] - 66s 170ms/step - loss: 0.1659 - acc: 0.9928 - val_loss: 0.4609 - val_acc: 0.9199 - lr: 0.0010Epoch 198/200390/390 [==============================] - 66s 168ms/step - loss: 0.1670 - acc: 0.9922 - val_loss: 0.4691 - val_acc: 0.9183 - lr: 0.0010Epoch 199/200390/390 [==============================] - 66s 170ms/step - loss: 0.1657 - acc: 0.9930 - val_loss: 0.4644 - val_acc: 0.9197 - lr: 0.0010Epoch 200/200390/390 [==============================] - 66s 168ms/step - loss: 0.1658 - acc: 0.9925 - val_loss: 0.4636 - val_acc: 0.9188 - lr: 0.0010学習にかかった時間:13360.996019124985[s]学習結果の確認
学習したモデルを保存し、 学習データとテストデータで正解率の遷移をプロットします。
# モデルの保存model.save('resnet.h5')# グラフの表示plt.plot(history.history['acc'], label='train_acc')plt.plot(history.history['val_acc'], label='val_acc')plt.ylabel('acc')plt.xlabel('epoch')plt.legend(loc='best')plt.show()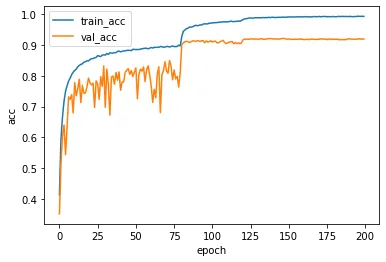
モデルの評価
テストデータに対して推論を行うことで、正解率を算出します。
# 評価batch_size = 128test_loss, test_acc = model.evaluate_generator( test_gen.flow(test_images, test_labels, batch_size=batch_size), steps=10)print('loss: {:.3f}\nacc: {:.3f}'.format(test_loss, test_acc ))/var/folders/nd/0z0s7wlj02n0lbwyl29p75mm0000gn/T/ipykernel_25473/1786729048.py:3: UserWarning: `Model.evaluate_generator` is deprecated and will be removed in a future version. Please use `Model.evaluate`, which supports generators. test_loss, test_acc = model.evaluate_generator(
loss: 0.474acc: 0.927200エポックの場合だとテストデータの正解率は92.7%でした。
推論
テストデータに対して推論を行い、処理時間と推論結果を画像とラベルで表示します。
# 推論する画像の表示plt.figure(figsize=(10,4))plt.subplots_adjust(wspace=0.3, hspace=0)for i in range(10): plt.subplot(2, 5, i+1) plt.imshow(test_images[i])plt.show()
# 推論したラベルの表示now = time.time()test_predictions = model.predict_generator( test_gen.flow(test_images[0:10], shuffle = False, batch_size=1), steps=10)pred_time = time.time() - nowprint(f"推論にかかった時間(10枚):{pred_time}[s]")print(f"推論にかかった時間(1枚):{pred_time/10}[s]")test_predictions = np.argmax(test_predictions, axis=1)labels = ['airplane', 'automobile', 'bird', 'cat', 'deer', 'dog', 'frog', 'horse', 'ship', 'truck']print([labels[n] for n in test_predictions])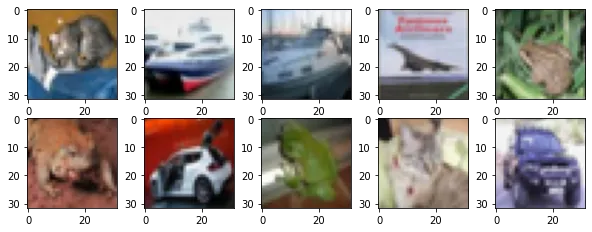
/var/folders/nd/0z0s7wlj02n0lbwyl29p75mm0000gn/T/ipykernel_25473/5816906.py:11: UserWarning: `Model.predict_generator` is deprecated and will be removed in a future version. Please use `Model.predict`, which supports generators. test_predictions = model.predict_generator(2022-07-03 14:57:35.879282: I tensorflow/core/grappler/optimizers/custom_graph_optimizer_registry.cc:113] Plugin optimizer for device_type GPU is enabled.
推論にかかった時間(10枚):0.36969590187072754[s]推論にかかった時間(1枚):0.03696959018707276[s]['cat', 'ship', 'ship', 'airplane', 'frog', 'frog', 'automobile', 'frog', 'cat', 'automobile']まとめ
今回の記事のまとめです。
- M1チップMacbook AirのGPUを使ってtensorflowでResNetでの学習と推論を行いました。
- バッチサイズ128・エポック数200程度の学習終了までにかかった時間は 13360 秒(約3.7時間)程度でした。
- 1枚の推論にかかる時間は 0.03 秒程度でした。
- テストデータでの正解率は 95%程度でした。
ちなみに、エポック20程度での結果も比較対象として下の表には載せています。
| 比較対象 | エポック数 | 学習時間 | 推論時間/枚 | テストデータ正解率 |
|---|---|---|---|---|
| CNN(12層程度) | 20 | 238秒 | 0.008秒 | 78% |
| ResNet(176層程度) | 20 | 1405秒 | 0.06秒 | 75% |
| ResNet(176層程度) | 200 | 13360秒 | 0.03秒 | 95% |
今回のResNetは前回のCNNと比べ多層であるため、 エポック数を重ねなければ精度が高まらないようでした。
M1チップMacbook AirのGPUとはいえ、多層構造のニューラルネットワークの学習には結構時間がかかってしまうようです。 やっぱりオンプレでやるとしたら、ゲーミングPC等でGPUがついているものを使用したほうがよさそうですね。 試しに層の薄いモデルで実行するぐらいなら、M1チップは強力なんですけどね。
結論としては、M1チップMacbook Airでも複雑な多層構造のニューラルネットワークの学習は可能ですが、結構時間がかかっちゃいます。それでも、精度が95%近くになるのは優秀。
ということで今日はここまで。